Uploading local files to a workstation
Your workstation provides the software and compute power to run your analyses - you just need to bring the data! There are a few ways to get data from external sources on to a running workstation.
- rsync (over SSH)
- scp (over SSH)
- WinSCP (over SSH, for Windows users)
- VS Code server
- JupyterLab
- RStudio Server
Uploading over SSH (recommended for large files or directories)
SSH is the best way to upload large files from your computer or a server. We recommend using rsync, a free tool for copying files. rsync can be installed with the system package manager on Linux/WSL or with Homebrew on Mac. scp is a similar tool without as many features, and comes pre-installed on most Linux distributions and Mac.
We recommend you first complete the advanced SSH configuration to reduce the amount of verbosity in these commands.
Upload a single file to a workstation
Run the command below to copy the single file fastq/sample_1.fastq.gz on your local machine to /home/bench-user/sample_1.fastq.gz on your workstation, replacing the following variables:
org-id: Replace with the ID of your organization, such asacme-bio.workstation-id: Replace with the ID of your workstation, such asexceptional-panda-g1i.blueprint-id: Replace with the ID of the blueprint, such aspython.compute-cluster-id: Replace with the ID of your compute cluster, such asus-west-2.aws.ssh-private-key-file: Replace with the path to your private SSH key, such as~/.ssh/id_rsa.
- rsync
- scp
- rsync (with advanced SSH configuration)
- scp (with advanced SSH configuration)
rsync -P -e \
    'ssh -i {ssh-private-key-file} -o "ProxyCommand openssl s_client -quiet -connect {compute-cluster-id}.bench.deeporigin.io:2222 -servername {workstation-id}-{blueprint-id}.org-{org-id}"' \
    fastq/run_1.fastq.gz \
    bench-user@{workstation-id}:/home/bench-user
scp -o "IdentityFile {ssh-private-key-file}" \
    -o "ProxyCommand openssl s_client -quiet -connect {compute-cluster-id}.bench.deeporigin.io:2222 -servername {workstation-id}-{blueprint-id}.org-{org-id}" \
    fastq/run_1.fastq.gz \
    -q \
    bench-user@{workstation-id}:/home/bench-user
rsync -P fastq/sample_1.fastq.gz {workstation-id}-{blueprint-id}.org-{org-id}.{compute-cluster-id}.bench.deeporigin.io:/home/bench-user
scp -q fastq/sample_1.fastq.gz {workstation-id}-{blueprint-id}.org-{org-id}.{compute-cluster-id}.bench.deeporigin.io:/home/bench-user
Upload a directory to a workstation
Run the command below to copy the directory fastq on your local machine to /home/bench-user/fastq on the workstation, replacing the following variables:
org-id: Replace with the ID of your organization, such asacme-bio.workstation-id: Replace with the ID of your workstation, such asexceptional-panda-g1i.blueprint-id: Replace with the ID of the blueprint, such aspython.compute-cluster-id: Replace with the ID of your compute cluster, such asus-west-2.aws.ssh-private-key-file: Replace with the path to your private SSH key, such as~/.ssh/id_rsa.
- rsync
- scp
- rsync (with advanced SSH configuration)
- scp (with advanced SSH configuration)
rsync -rP -e \
    'ssh -i {ssh-private-key-file} -o "ProxyCommand openssl s_client -quiet -connect {compute-cluster-id}.bench.deeporigin.io:2222 -servername {workstation-id}-{blueprint-id}.org-{org-id}"' \
    fastq \
    bench-user@{workstation-id}:/home/bench-user
It's important to leave the trailing slash off of the local path fastq, otherwise rsync will copy the contents of fastq, rather than the whole directory.
scp -r \
    -o "IdentityFile {ssh-private-key-file}" \
    -o "ProxyCommand openssl s_client -quiet -connect {compute-cluster-id}.bench.deeporigin.io:2222 -servername {workstation-id}-{blueprint-id}.org-{org-id}" \
    -q \
    fastq \
    bench-user@{workstation-id}:/home/bench-user
rsync -rP fastq {workstation-id}-{blueprint-id}.org-{org-id}.{compute-cluster-id}.bench.deeporigin.io:/home/bench-user/
It's important to leave the trailing slash off of the local path fastq, otherwise rsync will copy the contents of fastq, rather than the whole directory.
scp -r -q fastq/ {workstation-id}-{blueprint-id}.org-{org-id}.{compute-cluster-id}.bench.deeporigin.io:/home/bench-user
Helpful rsync options
A few particularly helpful rsync flags are listed below. Use man rsync to get a full explanation of all the options.
--update, -u- This forces rsync to skip any files which exist on the destination and have a modified time that is newer than the source file. (If an existing destination file has a modification time equal to the source file's, it will be updated if the sizes are different.)
-P- The -P option is equivalent to
--partial --progress. Its purpose is to make it much easier to specify these two options for a long transfer that may be interrupted.
- The -P option is equivalent to
--partial- By default, rsync will delete any partially transferred file if the transfer is interrupted. In some circumstances it is more desirable to keep partially transferred files. Using the
--partialoption tells rsync to keep the partial file which should make a subsequent transfer of the rest of the file much faster.
- By default, rsync will delete any partially transferred file if the transfer is interrupted. In some circumstances it is more desirable to keep partially transferred files. Using the
--progress- This option tells rsync to print information showing the progress of the transfer.
--recursive, -r- This tells rsync to copy directories recursively.
--archive, -a- It is a quick way of saying you want recursion and want to preserve almost everything.
--dry-run, -n- This makes rsync perform a trial run that doesn't make any changes (and produces mostly the same output as a real run). It is most commonly used in combination with the
--verbose (-v)and/or--itemize-changes (-i)options to see what an rsync command is going to do before one actually runs it.
- This makes rsync perform a trial run that doesn't make any changes (and produces mostly the same output as a real run). It is most commonly used in combination with the
Uploading with WinSCP
WinSCP is a free tool for managing files on remote servers from a Windows computer. It works similar to PuTTY. After a connection to your workstation is established with WinSCP, you can easily transfer files back and forth with the graphical user interface.
Connecting WinSCP PuTTy requires OpenSSL. Please follow these instructions to install OpenSSL.
If your private key file doesn't have a .ppk extension, it needs to be converted to PuTTY format before use with WinSCP. Follow these instructions to convert your key to PuTTY format.
- Download and install WinSCP. Ensure OpenSSL is installed as well.
- Open the WinSCP program. At the "Login" interface, you should see the "New Site" server selected on the left.
- Make the following changes in the "Session" tab currently shown:
- File protocol: SCP
- Host name: the ID for your workstation.
- User name:
bench-user
- Select "Advanced..."
- Select "Proxy" under the "Connection" option in the left menu. Fill in the following Proxy options:
- Proxy type: local
- Local proxy command:
C:\Program Files\Git\usr\bin\openssl.exe s_client -quiet -connect {compute-cluster-id}.bench.deeporigin.io:2222 -servername {workstation-id}-{blueprint-id}.org-{org-id}, replacing the following variables:org-id: Replace with the ID of your organization, such asacme-bio.workstation-id: Replace with the ID of your workstation, such asexceptional-panda-g1i.blueprint-id: Replace with the ID of the blueprint, such aspython.compute-cluster-id: Replace with the ID of your compute cluster, such asus-west-2.aws.
- Select "Authentication" under the "SSH" option in the left menu.
- Select the "..." icon to browse for your private key file with a
.ppkextension, and select it.
- Select the "..." icon to browse for your private key file with a
- Click "OK" at the bottom of the Advanced Site Settings window.
- In the Login window, click "Save". You should see a saved entry with the name of your workstation in the site list.
- Ensure your workstation is selected in the left list, and click "Login" at the bottom of the window.
- You can now transfer files back and forth to your workstation. Please see the WinSCP documentation for further help.
Uploading when connected to VS Code over SSH
After you have connected to VS Code over SSH, you can simply drag-and-drop a file or folder into the "Explorer" panel in VS Code to upload it to your workstation.
Uploading over the web
Many of the web endpoints provided for workstations have a way to upload single files. These may be slower than SSH, don't offer the ability to upload folders, and can't selectively upload newer files or resume failed transfers.
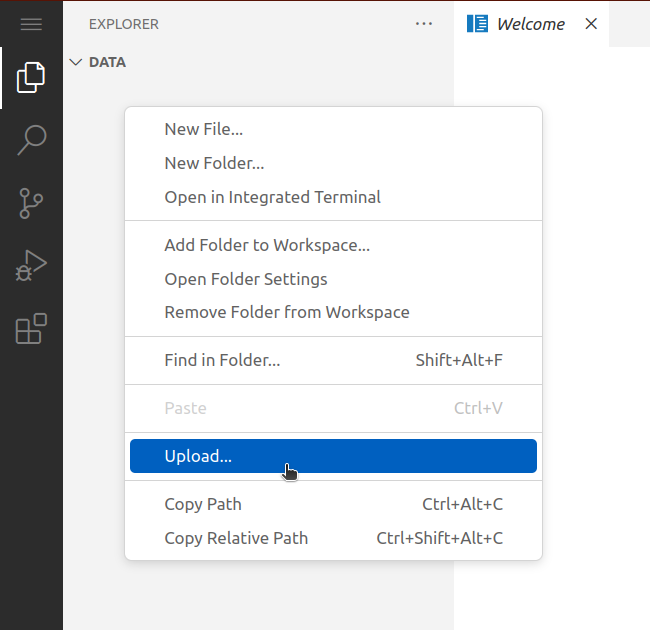
Uploading files in VS Code server
- Open the VS Code server web endpoint from the workstation list.
- Select "File > Open Folder" from the menu to navigate to the location on the workstation you would like to upload the file.
- In the "Explorer" tab on the left side of the interface, right click and select "Upload".
- Select the file on your local computer from the menu. Large files may take some time to upload, and progress can be tracked in the status bar on the bottom of the interface.
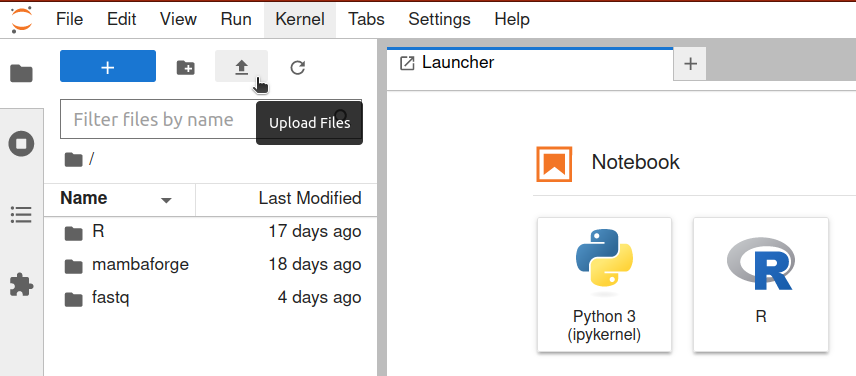
Uploading files in JupyterLab
- Open the JupyterLab web endpoint from the workstation list.
- From the "File Browser" sidebar, select "Upload Files" (the icon with the arrow pointing upwards).
- Select the file on your local computer from the menu.
Uploading files in RStudio Server
- Open the RStudio Server web endpoint from the workstation list.
- From the "File" sidebar, select "Upload".
- Select the file on your local computer and the destination on the workstation from the menu.
