Databases
A database is a container for organizing tabular data, such as metadata about biological samples, and related files and notebooks. Databases provide scientists a structured way to store and retrieve information, making it easier for researchers to track their results and associated files and procedures.
A database consists of rows, columns, notebooks, and files that can hold information about different types of entities, such as samples, protocols, experiments, and assay results. Each row in a database represents a single instance, such as a single sample; each column represents a specific attribute about the type of entity, such as the DNA sequence of a sample. Each row has a cell for each column. In addition, each row can have a notebook. Files can be captured both by cells and notebooks.
Each column can have a defined data type and validation rules to ensure that information is captured consistently and accurately. For example, a DNA sequence column can be validated to only contain the canonical bases A, C, G, and T or validated to utilize the larger IUPAC alphabet.
We support four categories of columns:
- Basic columns such as for numbers and text. In database pages, these columns are displayed as the columns of a data grid. In row pages, these columns are displayed at the top of each page as a list of attributes and their values.
- File columns such as for capturing GenBank files for sequences and PDB files for protein structures. File columns are displayed similarly to basic columns.
- Reference columns for capturing relationships to another database, such as the cell line measured in an RNA-seq assay. Reference columns are displayed similarly to basic columns.
- Formula and reference lookup columns for creating calculated values that are derived from other columns in the database. Formulas support complex calculations and data transformations.
Notebooks can be used to capture notes, such as experimental protocols and experimental record. Notebooks can include headings, paragraphs, lists, tables, images, files, local databases, views of global databases, and references to rows, databases, and folders. Notebooks are only displayed in row pages.
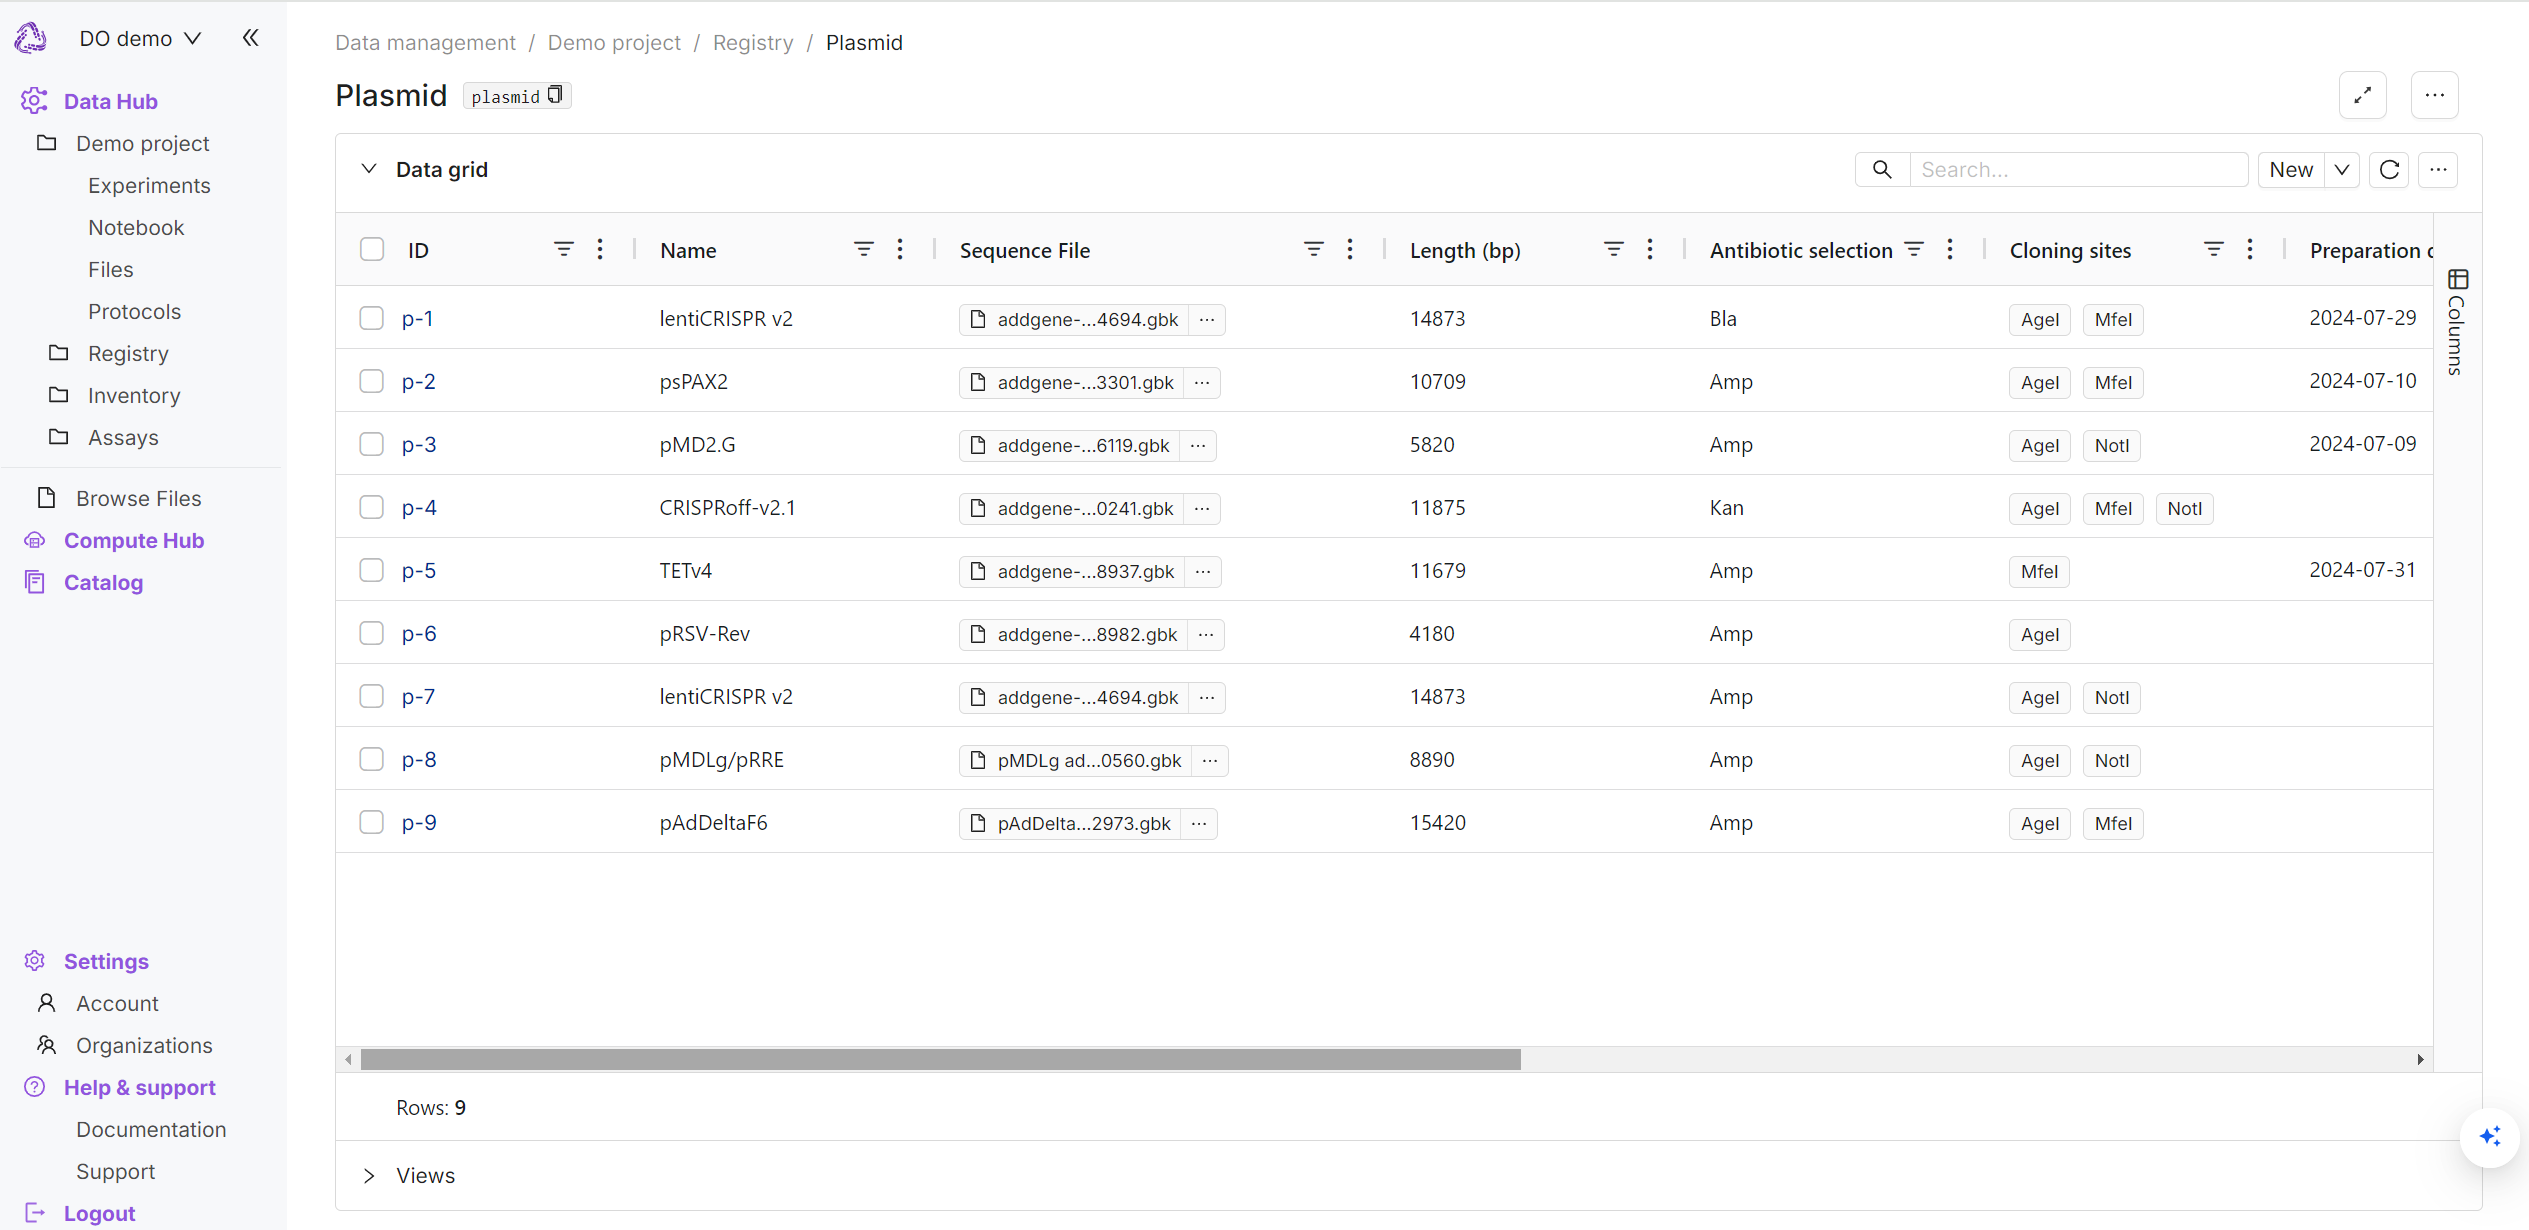
Example database: Plasmids
The screenshot below shows an example of a database for capturing plasmids. Each row of the database represents a specific plasmid. The columns of the database capture several attributes of plasmids, including their IDs, their sequences, the protocols used to prepare them, records of their preparations, and the outputs of the experiments that confirmed their sequences.
Creating, updating, and deleting databases
Creating a database
- Select the parent folder for the database: In the left sidebar, select the parent folder for your new database and click its "+" button.
- Open the create database dialog: In the menu the opens, select "Database".
- Enter a name, ID, and row ID prefix for the database: In the popup that opens, enter a name, ID, and prefix for the row of your database. IDs can only contain letters, numbers, underscores, and dashes. Each ID must be unique across your organization. IDs can be used to programmatically retrieve databases. The row prefix will be used to automatically generate a unique ID for each row of the database.
- Create the database: To create your database, click the "Create database" button at the bottom of the popup window.
Updating a database
- Find your database: Select your database in the left sidebar.
- Open the settings for the database: When you hover over your database, a "…" button will become visible. Click the "…" button and select the "Update" option.
- Modify the settings for the database: In the popup window that appears, you can edit the name, ID, and row ID prefix of the database. Changing the row ID prefix will only affect new rows of the database.
- Save your changes: To save your changes, click the "Save changes" button at the bottom of the pop-up window.
Deleting a database
- Find your database: Select your database in the left sidebar.
- Delete the database: When you hover over your database, a "…" button will become visible. Click the "…" button and select the "Delete" option. In the confirmation dialog that opens, click the "OK" button to delete the database.
Creating, editing, and deleting columns
Creating a column
- Find your database: Select your database in the left sidebar.
- Open the new column wizard: Click the "+" button at the right end of the headings for the database.
- Configure the new column:
- Enter a descriptive name for the column, such as "Structure" for a column for capturing the structure of each species in a database of chemicals.
- Select the type of the column, such as "Text" for a column for chemical structures, and configure the options for the selected type. More information about the available column types is here.
- Optionally, check "Required" to make the column required. When a column is required, empty cells will be highlighted as errors.
- Finalize the new column: Click the "Create column" button.
Editing a column
- Find your database: Select your database in the left sidebar.
- Show the column: If the column is hidden, open the "Columns" panel at the right side of the data grid and check the column to show it.
- Open the edit window for the column: Find the column, click its actions (:) menu at the top-right of the column, and select the "Edit column" option. This will open a window where you can edit the properties of the column.
- Edit the column: In the window that opens, edit the properties of the column.
- Save your changes: Click the "Save changes" button to save your changes to the column.
Deleting a column
- Find your database: Select your database in the left sidebar.
- Show the column: If the column is hidden, open the "Columns" panel at the right side of the data grid and check the column to show it.
- Open the edit window for the column: Find the column, click its actions (:) menu at the top-right of the column, and select the "Delete column" option. This will open a window which will ask you to confirm that you'd like to delete the column.
- Confirm: In the window that opens, click "OK" to confirm that you'd like to delete the column.
Creating, editing, duplicating, and deleting rows
Creating rows
There are multiple ways to add rows to a database:
- Click the "New" button at the top right corner of the data grid for the database.
- Right-click within the data grid for the database. In the context menu that opens, select "Add row" to add a single row or "Insert row above" or "Insert row below" to add multiple rows.
To save your new rows, type Alt+Enter (Option + Return on Mac). New rows are not saved automatically saved; if you refresh your browser without saving your new rows, any data in the unsaved rows will be lost.
Duplicating rows
Follow these instructions to duplicate one or more rows:
- Select the row or rows to be duplicated by clicking a single row or using the checkboxes at the left of the grid for the database.
- Right-click within the database. In the context menu that appears, select the option "Duplicate row".
Deleting the values of cells
To delete the content of one or more cells in a database, follow these steps:
- Select the cells.
- Press "Delete" with your keyboard.
Deleting rows
To delete a row or rows from a database, follow these steps:
- Select the row or multiple rows to delete.
- Right-click within the database. In the context menu that appears, select the option "Delete selected rows".